
How to Enable P2P for the DMSS App on Your Recorder

Updated: Jul 29
Remote viewing has become an essential requirement for almost every CCTV installation. Whether you're installing a security system for a residential property, commercial premises, school, warehouse, or retail store, customers expect secure access to their cameras from anywhere using their smartphone.
One of the quickest and most reliable ways to achieve this is by enabling P2P (Peer-to-Peer) on your SPRO DVR or NVR and connecting it to the DMSS App.
This guide explains how to configure your recorder correctly, ensure the P2P service is online, and prepare the system for remote viewing without the need for complicated router configuration or port forwarding.
Watch the Video Tutorial
If you'd prefer to follow along visually, watch our complete step-by-step video guide below.
Why Enable P2P?
P2P (Peer-to-Peer) allows your CCTV recorder to establish a secure connection with the DMSS app, enabling remote access without manually configuring network ports or firewall rules.
For installers, this means:
Faster installation times
Simplified network configuration
Reduced support calls
Secure remote access
Easier handover to customers
Reliable remote monitoring
For end users, this means:
Simple QR code setup with no complex network configuration
View live camera feeds from anywhere with an internet connection
Playback recorded footage remotely
Receive motion detection and alarm notifications directly to their smartphone
Quickly share camera access with authorised family members or colleagues
Peace of mind knowing their property can be monitored anytime, from almost anywhere
By enabling P2P as part of the installation process, professionals can deliver a seamless remote viewing experience from day one, reducing setup complexity and minimising future support requirements. For consumers, P2P unlocks the full potential of their CCTV system, giving them the confidence to monitor their home or business anytime, anywhere through the DMSS app. The result is a solution that's not only easier to install but also more intuitive, convenient, and valuable to use every day.
Before You Begin
Before configuring P2P, make sure:
Your SPRO recorder is powered on.
The recorder is connected to the local network.
The network cable is securely connected.
Internet access is available.
Step-by-Step: Enable P2P on a SPRO Recorder
Step 1 – Log in to the Recorder
Access your recorder using the administrator account.

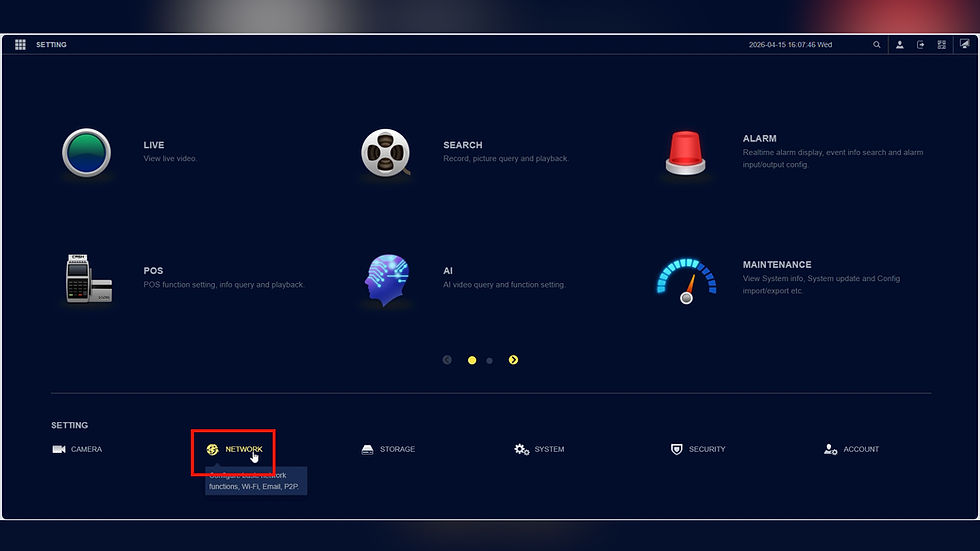
Step 2 – Open Network Settings
Navigate to:
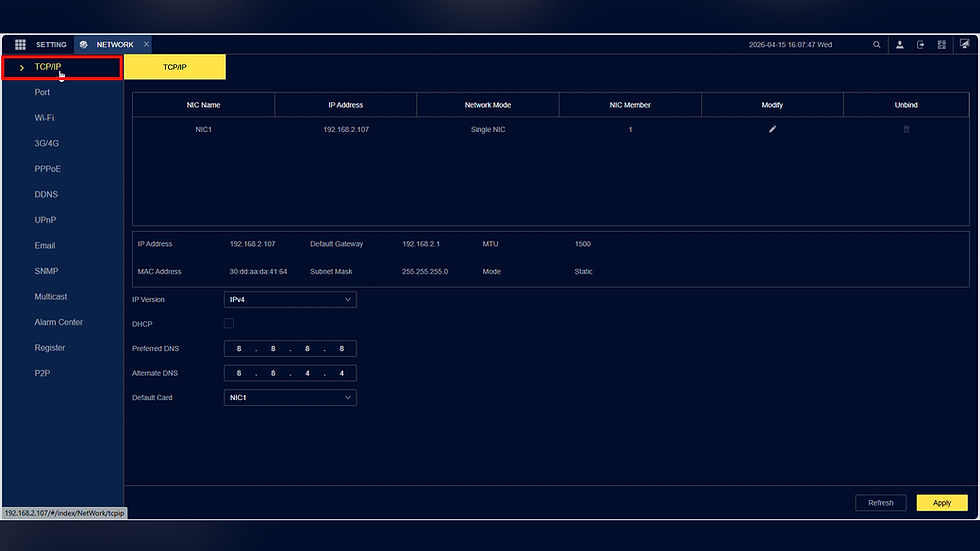
Main Menu → Network → TCP/IP
Step 3 – Record the Current IP Address
Before making any changes, note the recorder's current IP address.
This can be useful if you need to verify network settings later.

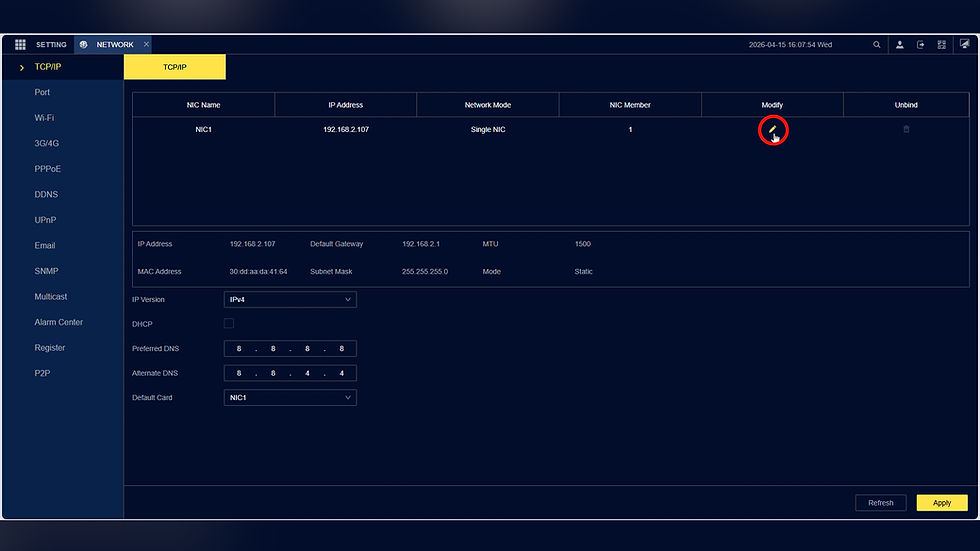
Step 4 – Modify the Network Configuration
Select Modify to edit the TCP/IP settings.
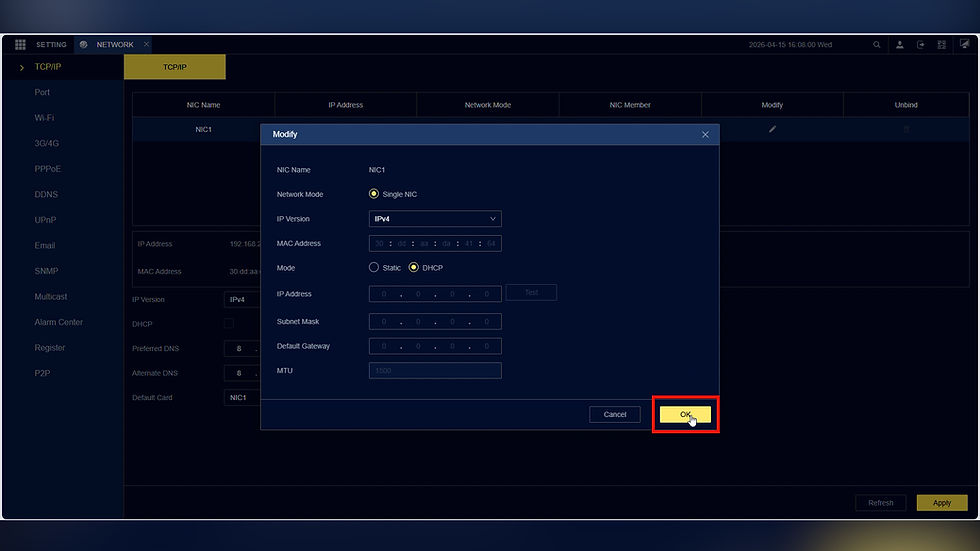
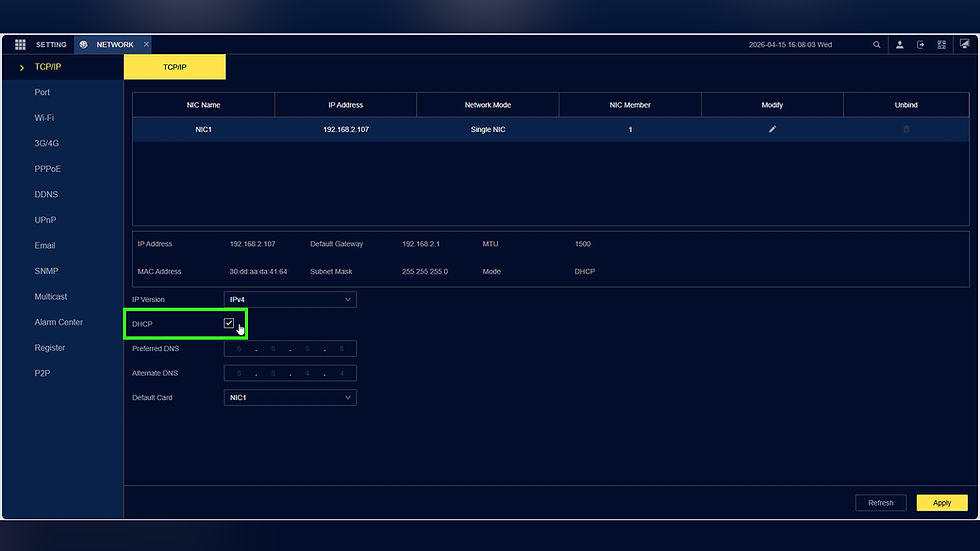
Step 5 – Enable DHCP
Tick DHCP.

This allows the router to automatically assign a valid IP address to the recorder.
Using DHCP helps prevent IP conflicts and ensures the recorder receives the correct network configuration.
Step 6 – Save the Settings
Click OK.
Step 7 – Enable DHCP for DNS
Ensure the DNS settings are also configured via DHCP.
Correct DNS settings are essential because the recorder must communicate with the P2P servers over the internet.
Step 8 – Apply the Changes
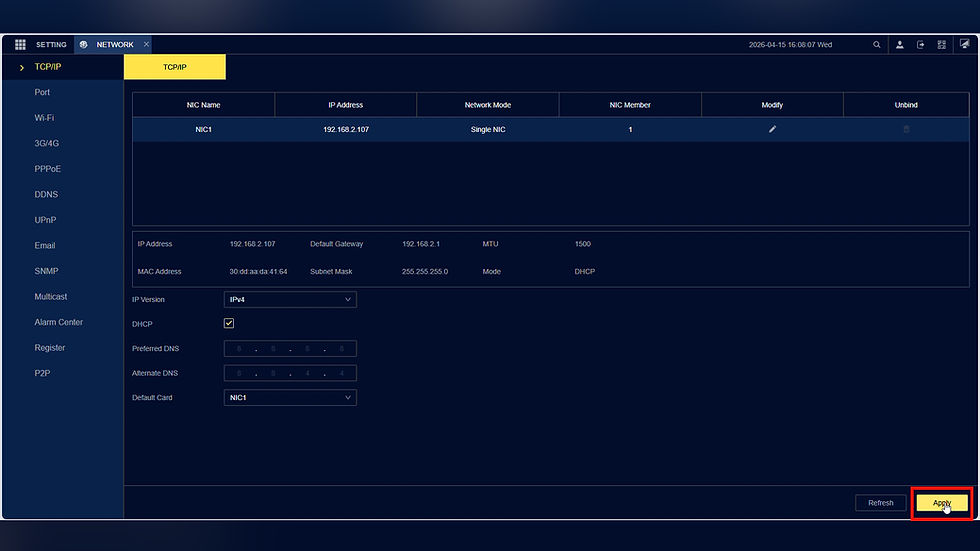
Select Apply.
The recorder may briefly refresh its network settings.
Step 9 – Wait for the IP Address to Update
After enabling DHCP, the recorder may receive a new IP address.
If the address does not update immediately, leave the page and reopen it.

Step 10 – Check the P2P Status
Navigate to:
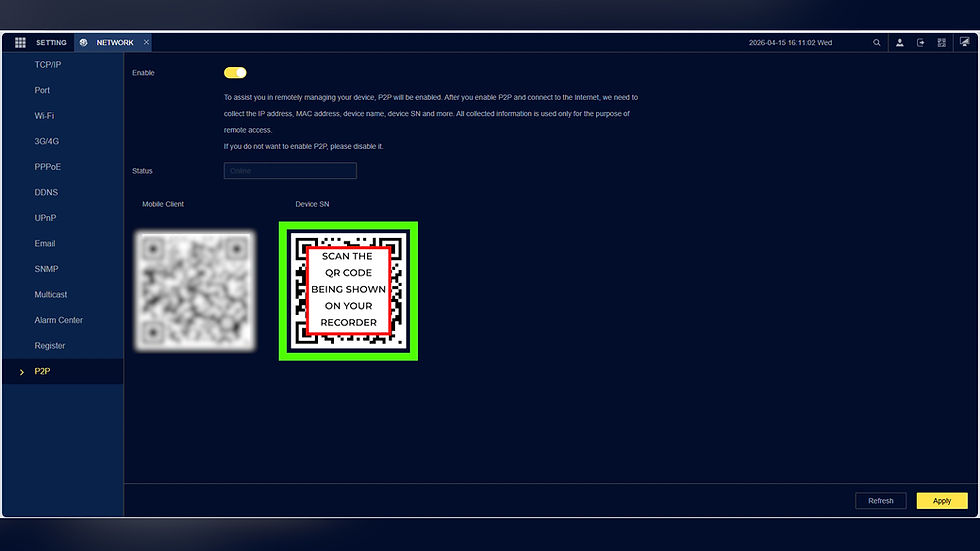
Network → P2P

The Status should display:
Online
If the status is online, your recorder has successfully connected to the P2P servers and is ready for remote access.

Step 11 – Add the Recorder to the DMSS App
Download and install the DMSS APP here:


If you don't have a DMSS account, you can learn how to create one by clicking here.
Open the DMSS App.

Scan the QR code displayed on the recorder. (Click here to learn how to Scan the QR Code using DMSS app)
Complete the device setup within the app.
Your customer can now securely view live and recorded footage from anywhere with an internet connection.
Troubleshooting P2P Offline
If the recorder displays Offline instead of Online, check the following:
Internet connection is working.
Network cable is connected.
DHCP is enabled.
DNS settings are correct.
Gateway settings are valid.
Router is providing internet access.
Ensure the recorders date, time and time zone are correct. time zone are correct.
In most cases, correcting the network configuration will resolve the issue.
Benefits for Professional Installers
Correctly configuring P2P offers several advantages for installers and security professionals.
Faster Installations
No need to configure router port forwarding on every installation.
Reduced Callbacks
Proper network configuration minimises future connectivity issues.
Improved Customer Experience
Customers can begin using remote viewing immediately after installation.
Secure Remote Access
P2P creates a secure connection between the recorder and the DMSS App without exposing unnecessary network ports.
Easier System Maintenance
Remote access makes future support, diagnostics, and customer assistance much more efficient.
Frequently Asked Questions
What is P2P on a CCTV recorder?
P2P (Peer-to-Peer) is a cloud-based connection service that allows users to securely access their CCTV recorder remotely through the DMSS App without configuring port forwarding.
Does enabling DHCP change my recorder's IP address?
Yes. Enabling DHCP allows the router to automatically assign an available IP address.
Why does my recorder show P2P Offline?
This usually indicates a network issue, such as incorrect DNS settings, no internet connection, or an invalid gateway configuration.
Do I need port forwarding?
No. P2P eliminates the need for manual port forwarding in most installations.
Need More SPRO Technical Guides?
Our technical support videos are designed specifically for CCTV installers, engineers, and trade professionals.
You'll find practical setup guides, troubleshooting tutorials, installation tips, networking advice, and product configuration videos covering SPRO CCTV systems and the DMSS App.
Subscribe to our YouTube channel to stay up to date with the latest installation guides and technical tutorials.
Final Thoughts
Enabling P2P is one of the simplest yet most important steps when commissioning a SPRO CCTV system. By ensuring the recorder is correctly configured and displays an Online P2P status, installers can provide customers with reliable remote viewing through the DMSS App in just a few minutes.
Following this process not only speeds up installation but also reduces support calls, improves customer satisfaction, and delivers a professional handover every time.
Whether you're installing a single recorder or deploying multiple CCTV systems, understanding the correct DMSS P2P setup process is an essential skill for every professional installer.


Comments